Okta
Note
Are you using this? Please contribute!
If you're using this IdP please consider contributing to this document.
A working Single Sign-On configuration using Okta via at least two methods was achieved using:
SAML (with Dex)
Note
Okta app group assignment
The Okta app's Group Attribute Statements regex will be used later to map Okta groups to Argo CD RBAC roles.
- Create a new SAML application in Okta UI.
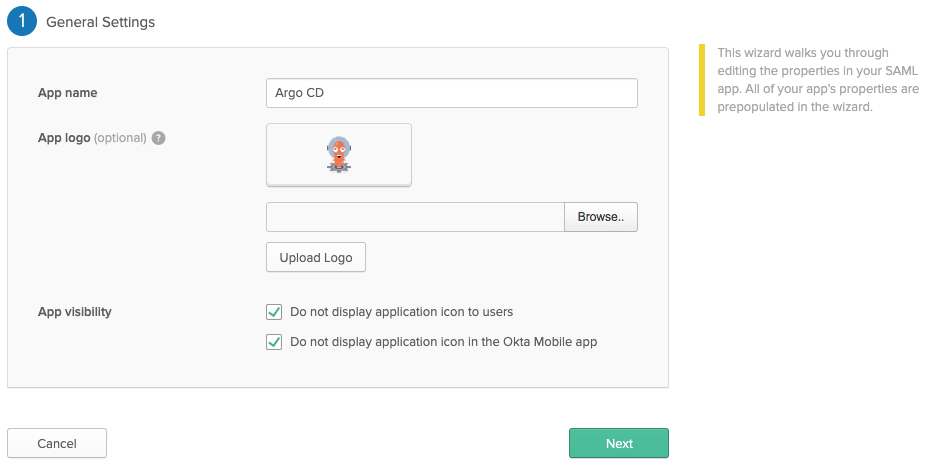 I've disabled
 App Visibilitybecause Dex doesn't support Provider-initiated login flows.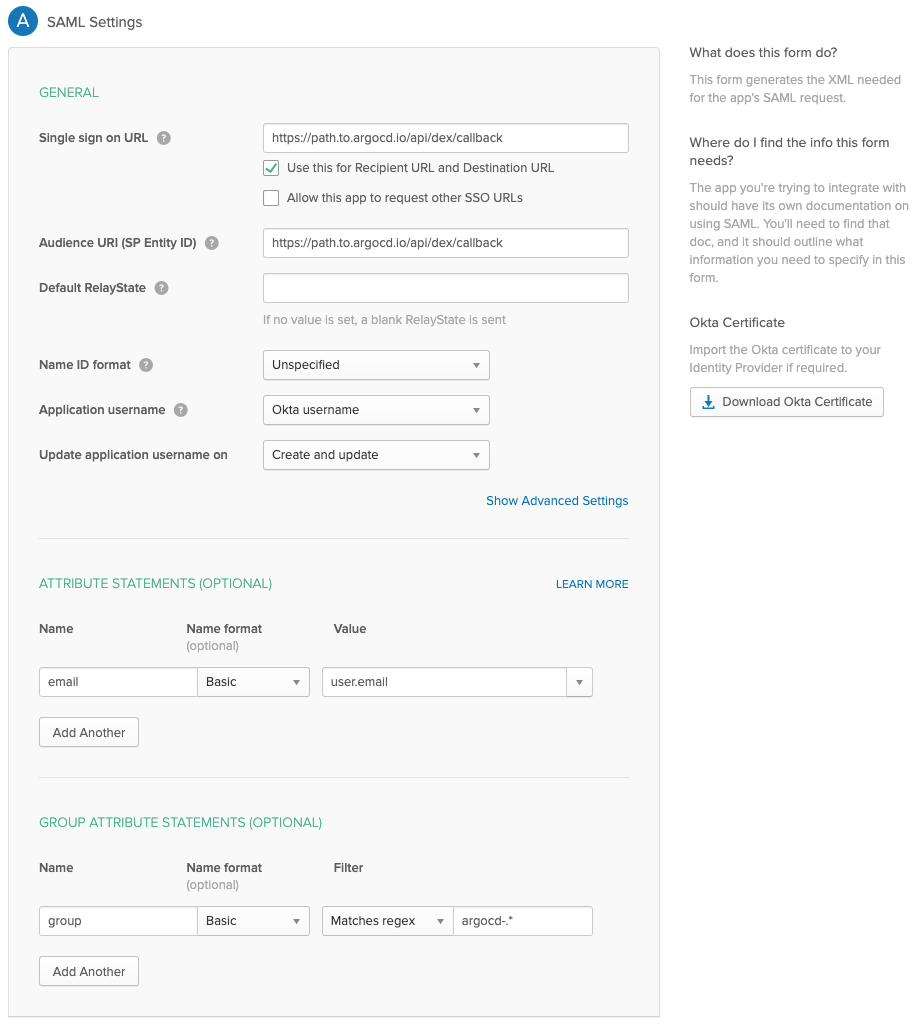
- Click
View setup instructionsafter creating the application in Okta. - Copy the Argo CD URL to the
argocd-cmin the data.url

data:
  url: https://argocd.example.com
- Download the CA certificate to use in the
argocd-cmconfiguration.- If you are using this in the caData field, you will need to pass the entire certificate (including
-----BEGIN CERTIFICATE-----and-----END CERTIFICATE-----stanzas) through base64 encoding, for example,base64 my_cert.pem. - If you are using the ca field and storing the CA certificate separately as a secret, you will need to mount the secret to the
dexcontainer in theargocd-dex-serverDeployment. 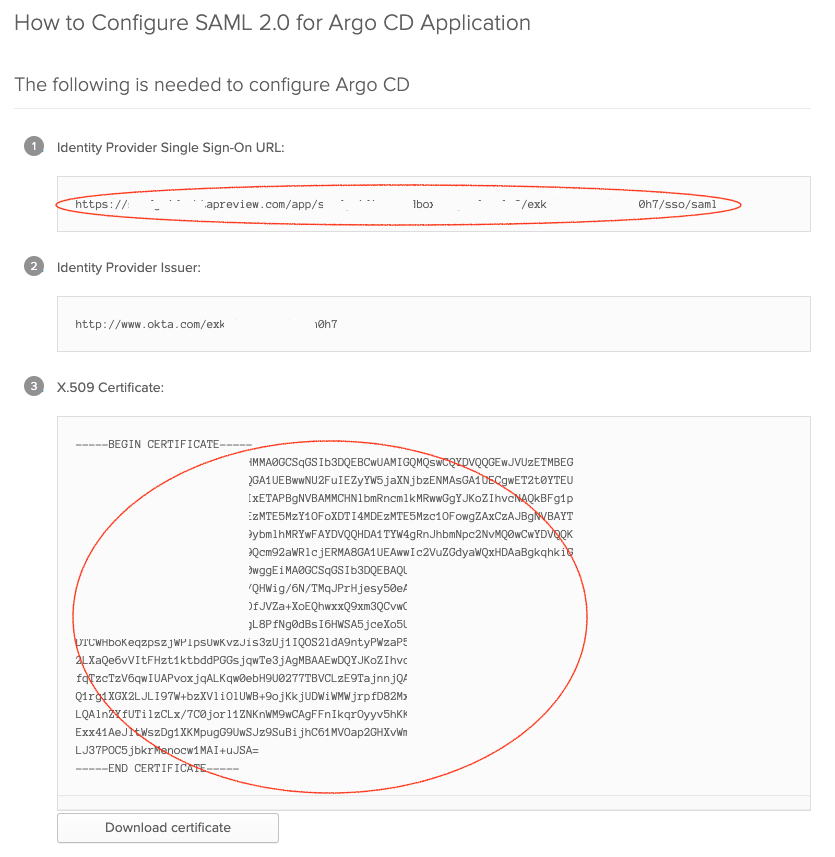
- If you are using this in the caData field, you will need to pass the entire certificate (including
- Edit the
argocd-cmand configure thedata.dex.configsection:
dex.config: |
  logger:
    level: debug
    format: json
  connectors:
  - type: saml
    id: okta
    name: Okta
    config:
      ssoURL: https://yourorganization.oktapreview.com/app/yourorganizationsandbox_appnamesaml_2/rghdr9s6hg98s9dse/sso/saml
      # You need `caData` _OR_ `ca`, but not both.
      caData: |
        <CA cert passed through base64 encoding>
      # You need `caData` _OR_ `ca`, but not both.
      # Path to mount the secret to the dex container
      ca: /path/to/ca.pem
      redirectURI: https://ui.argocd.yourorganization.net/api/dex/callback
      usernameAttr: email
      emailAttr: email
      groupsAttr: group
Private deployment
It is possible to setup Okta SSO with a private Argo CD installation, where the Okta callback URL is the only publicly exposed endpoint.
The settings are largely the same with a few changes in the Okta app configuration and the data.dex.config section of the argocd-cm ConfigMap.
Using this deployment model, the user connects to the private Argo CD UI and the Okta authentication flow seamlessly redirects back to the private UI URL.
Often this public endpoint is exposed through an Ingress object.
- Update the URLs in the Okta app's General settings
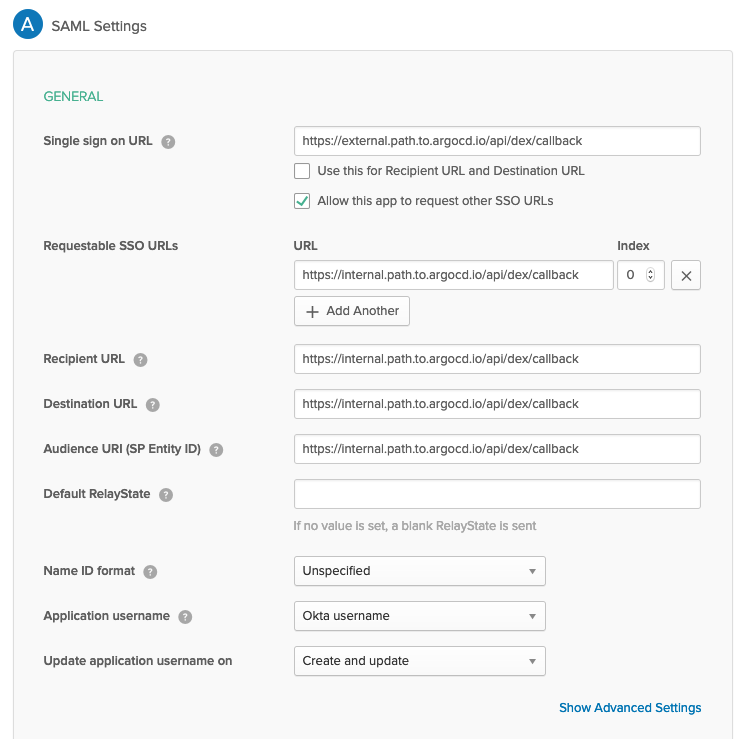 The
The Single sign on URLfield points to the public exposed endpoint, and all other URL fields point to the internal endpoint.
- Update the
data.dex.configsection of theargocd-cmConfigMap with the external endpoint reference.
dex.config: |
  logger:
    level: debug
  connectors:
  - type: saml
    id: okta
    name: Okta
    config:
      ssoURL: https://yourorganization.oktapreview.com/app/yourorganizationsandbox_appnamesaml_2/rghdr9s6hg98s9dse/sso/saml
      # You need `caData` _OR_ `ca`, but not both.
      caData: |
        <CA cert passed through base64 encoding>
      # You need `caData` _OR_ `ca`, but not both.
      # Path to mount the secret to the dex container
      ca: /path/to/ca.pem
      redirectURI: https://external.path.to.argocd.io/api/dex/callback
      usernameAttr: email
      emailAttr: email
      groupsAttr: group
Connect Okta Groups to Argo CD Roles
Argo CD is aware of user memberships of Okta groups that match the Group Attribute Statements regex.
The example above uses the argocd-* regex, so Argo CD would be aware of a group named argocd-admins.
Modify the argocd-rbac-cm ConfigMap to connect the argocd-admins Okta group to the builtin Argo CD admin role.
apiVersion: v1
kind: ConfigMap
metadata:
  name: argocd-rbac-cm
data:
  policy.csv: |
    g, argocd-admins, role:admin
  scopes: '[email,groups]'
OIDC (without Dex)
Warning
Okta groups for RBAC
If you want groups scope returned from Okta, you will need to enable API Access Management with Okta. This addon is free, and automatically enabled, on Okta developer edition. However, it's an optional add-on for production environments, with an additional associated cost.
You may alternately add a "groups" scope and claim to the default authorization server, and then filter the claim in the Okta application configuration. It's not clear if this requires the Authorization Server add-on.
If this is not an option for you, use the SAML (with Dex) option above instead.
Note
These instructions and screenshots are of Okta version 2023.05.2 E. You can find the current version in the Okta website footer.
First, create the OIDC integration:
- On the
Okta Adminpage, navigate to the Okta Applications atApplications > Applications. - Choose
Create App Integration, and chooseOIDC, and thenWeb Applicationin the resulting dialogues.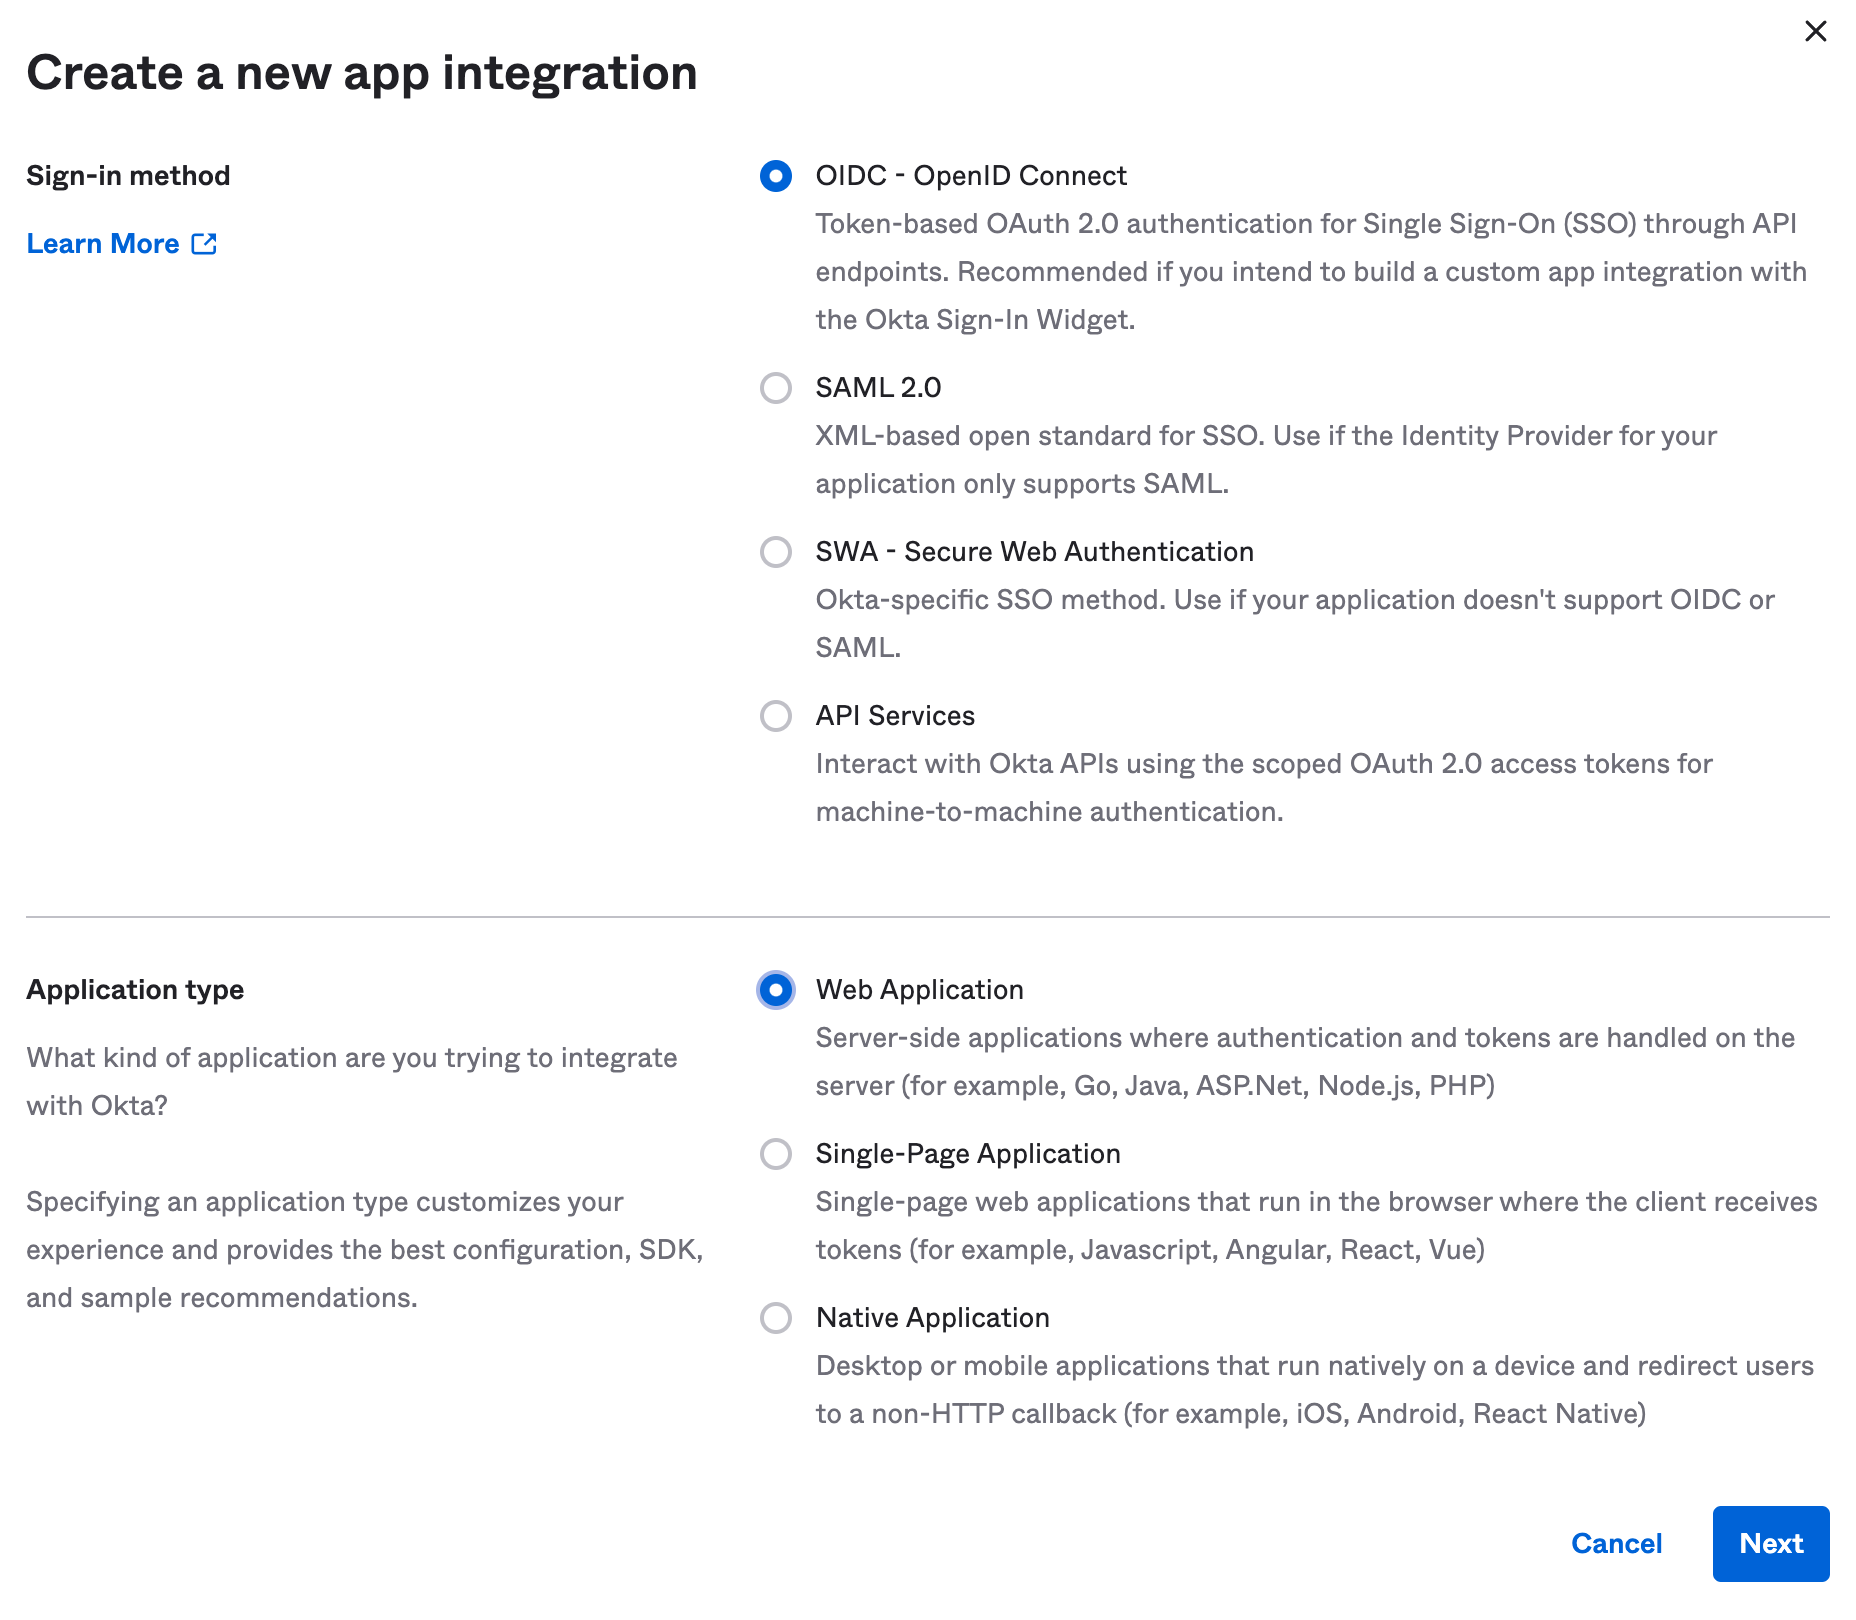
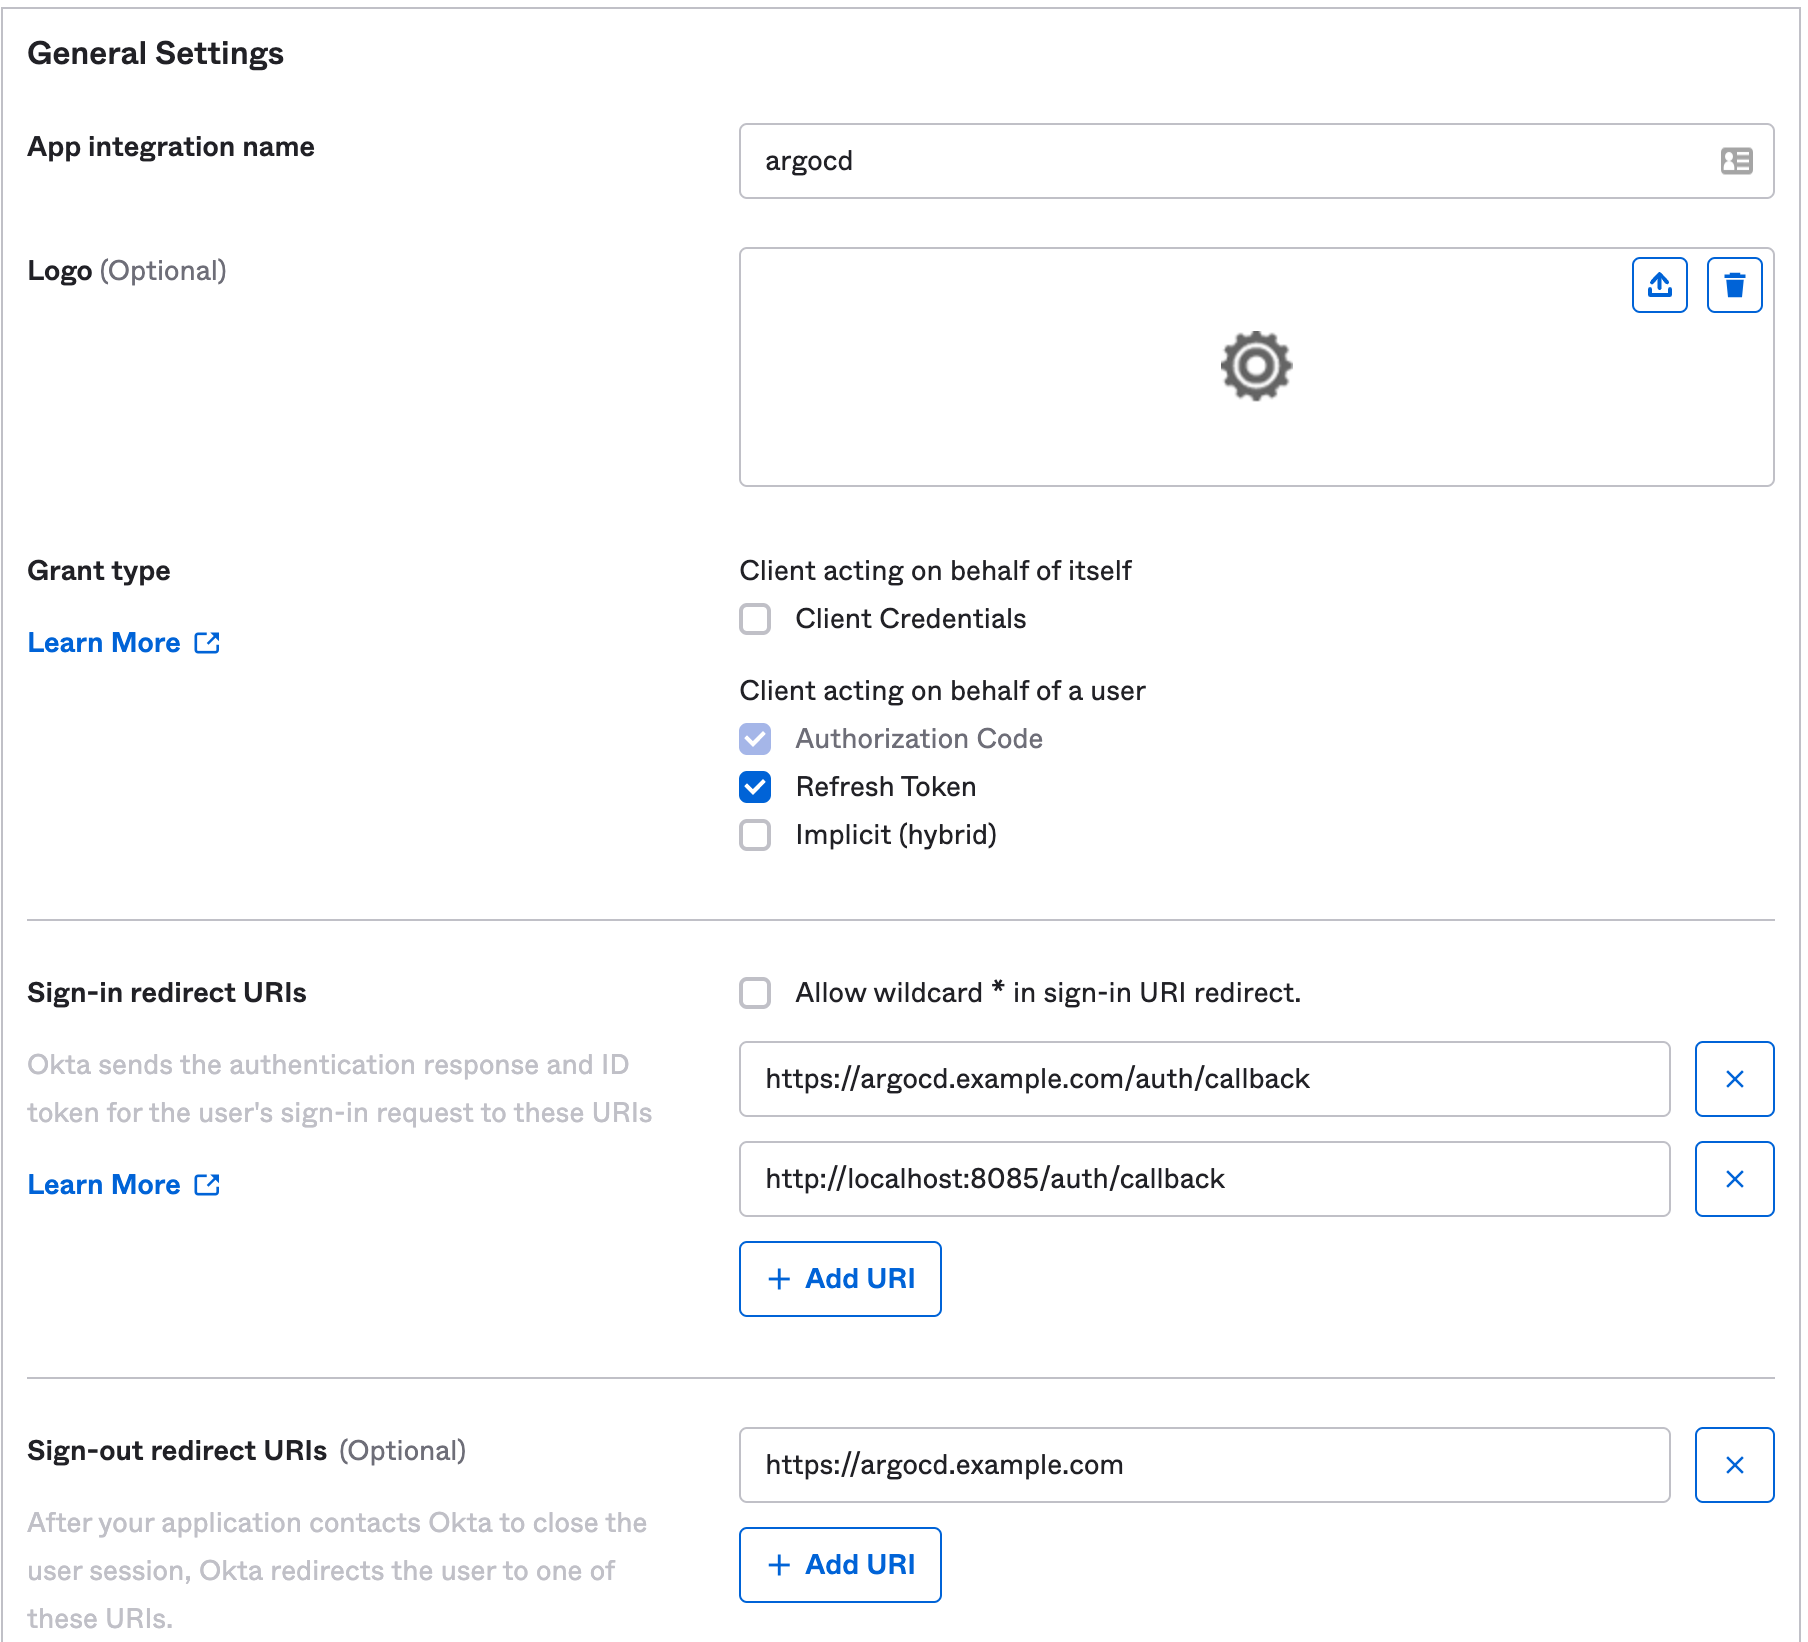
- Update the following:
App Integration nameandLogo- set these to suit your needs; they'll be displayed in the Okta catalogue.Sign-in redirect URLs: Addhttps://argocd.example.com/auth/callback; replacingargocd.example.comwith your ArgoCD web interface URL.Sign-out redirect URIs: Addhttps://argocd.example.com; substituting the correct domain name as above.- Either assign groups, or choose to skip this step for now.
- Leave the rest of the options as-is, and save the integration.
- Copy the
Client IDand theClient Secretfrom the newly created app; you will need these later.
Next, create a custom Authorization server:
- On the
Okta Adminpage, navigate to the Okta API Management atSecurity > API. - Click
Add Authorization Server, and assign it a name and a description. TheAudienceshould match your ArgoCD URL -https://argocd.example.com - Click
Scopes > Add Scope:- Add a scope called
groups. Leave the rest of the options as default.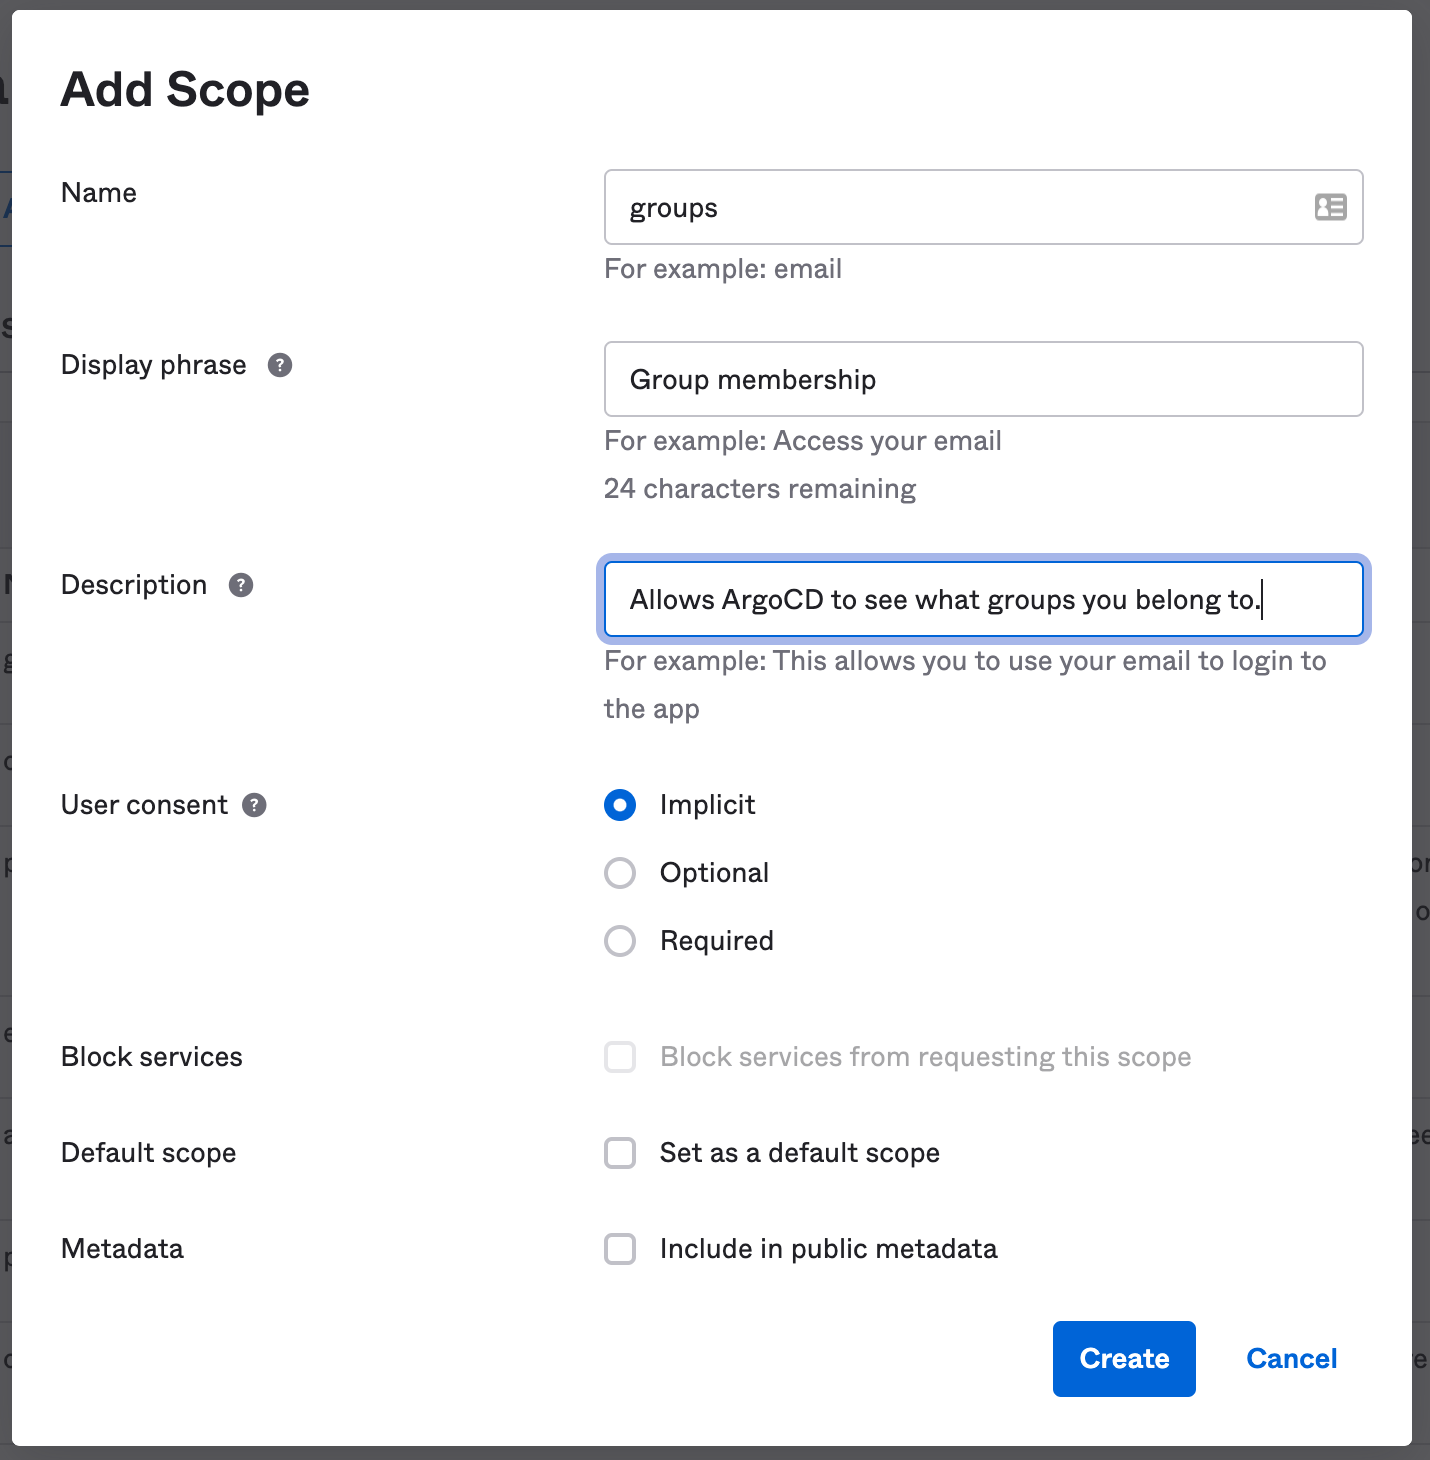
- Add a scope called
- Click
Claims > Add Claim:- Add a claim called
groups. - Adjust the
Include in token typetoID Token,Always. - Adjust the
Value typetoGroups. - Add a filter that will match the Okta groups you want passed on to ArgoCD; for example
Regex: argocd-.*. - Set
Include intogroups(the scope you created above).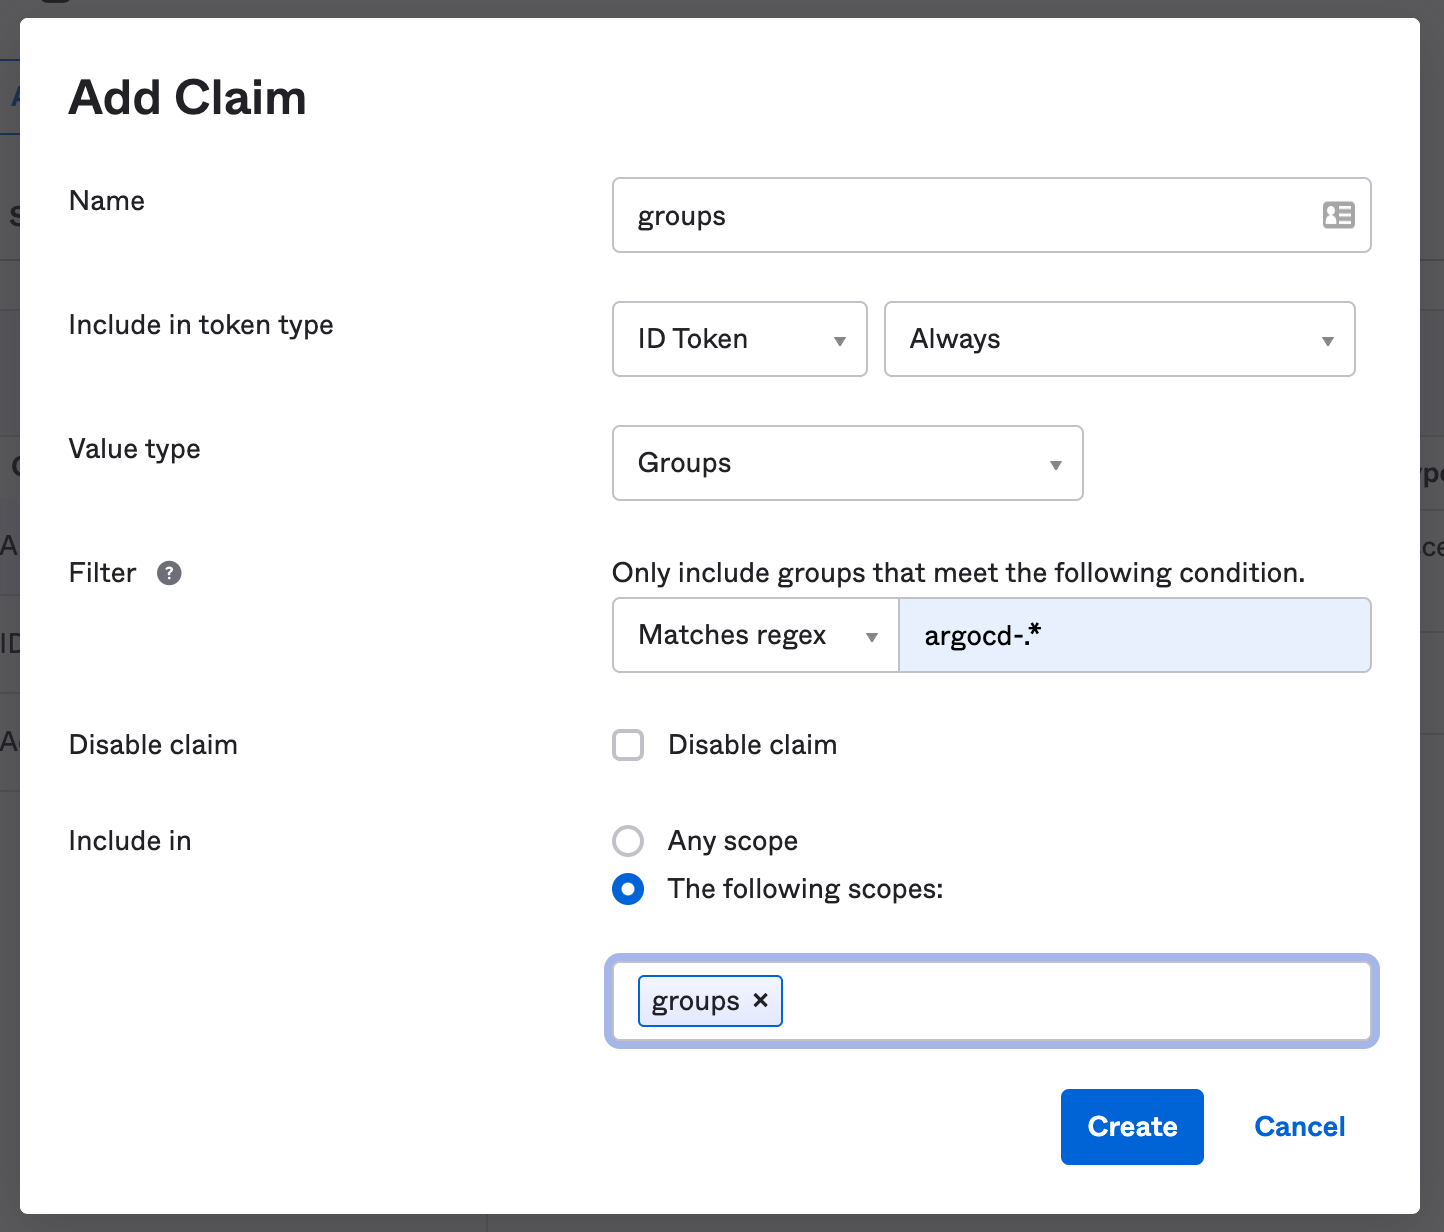
- Add a claim called
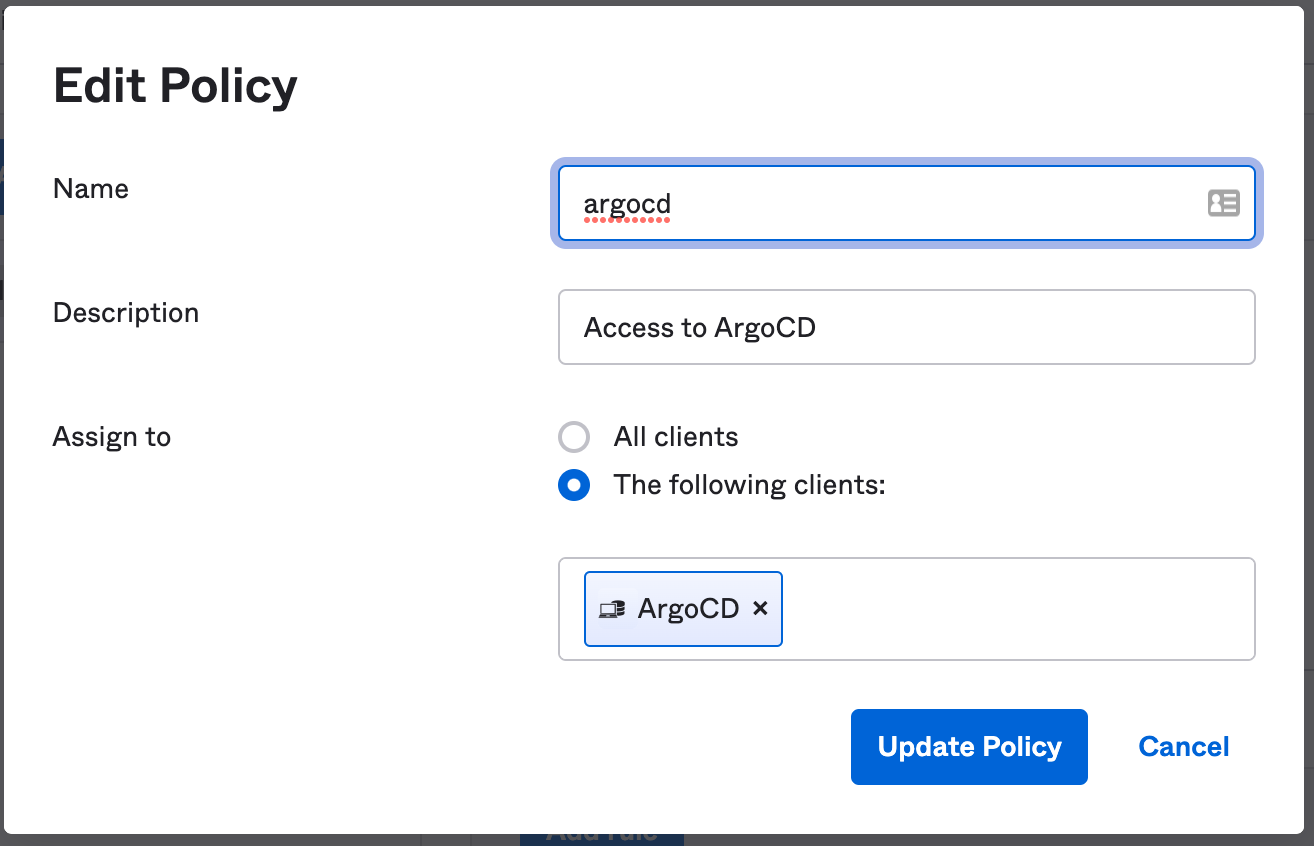
- Click on
Access Policies>Add Policy.This policy will restrict how this authorization server is used.- Add a name and description.
- Assign the policy to the client (application integration) you created above. The field should auto-complete as you type.
- Create the policy.
- Add a rule to the policy:
- Add a name;
defaultis a reasonable name for this rule. - Fine-tune the settings to suit your organization's security posture. Some ideas:
- uncheck all the grant types except the Authorization Code.
- Adjust the token lifetime to govern how long a session can last.
- Restrict refresh token lifetime, or completely disable it.
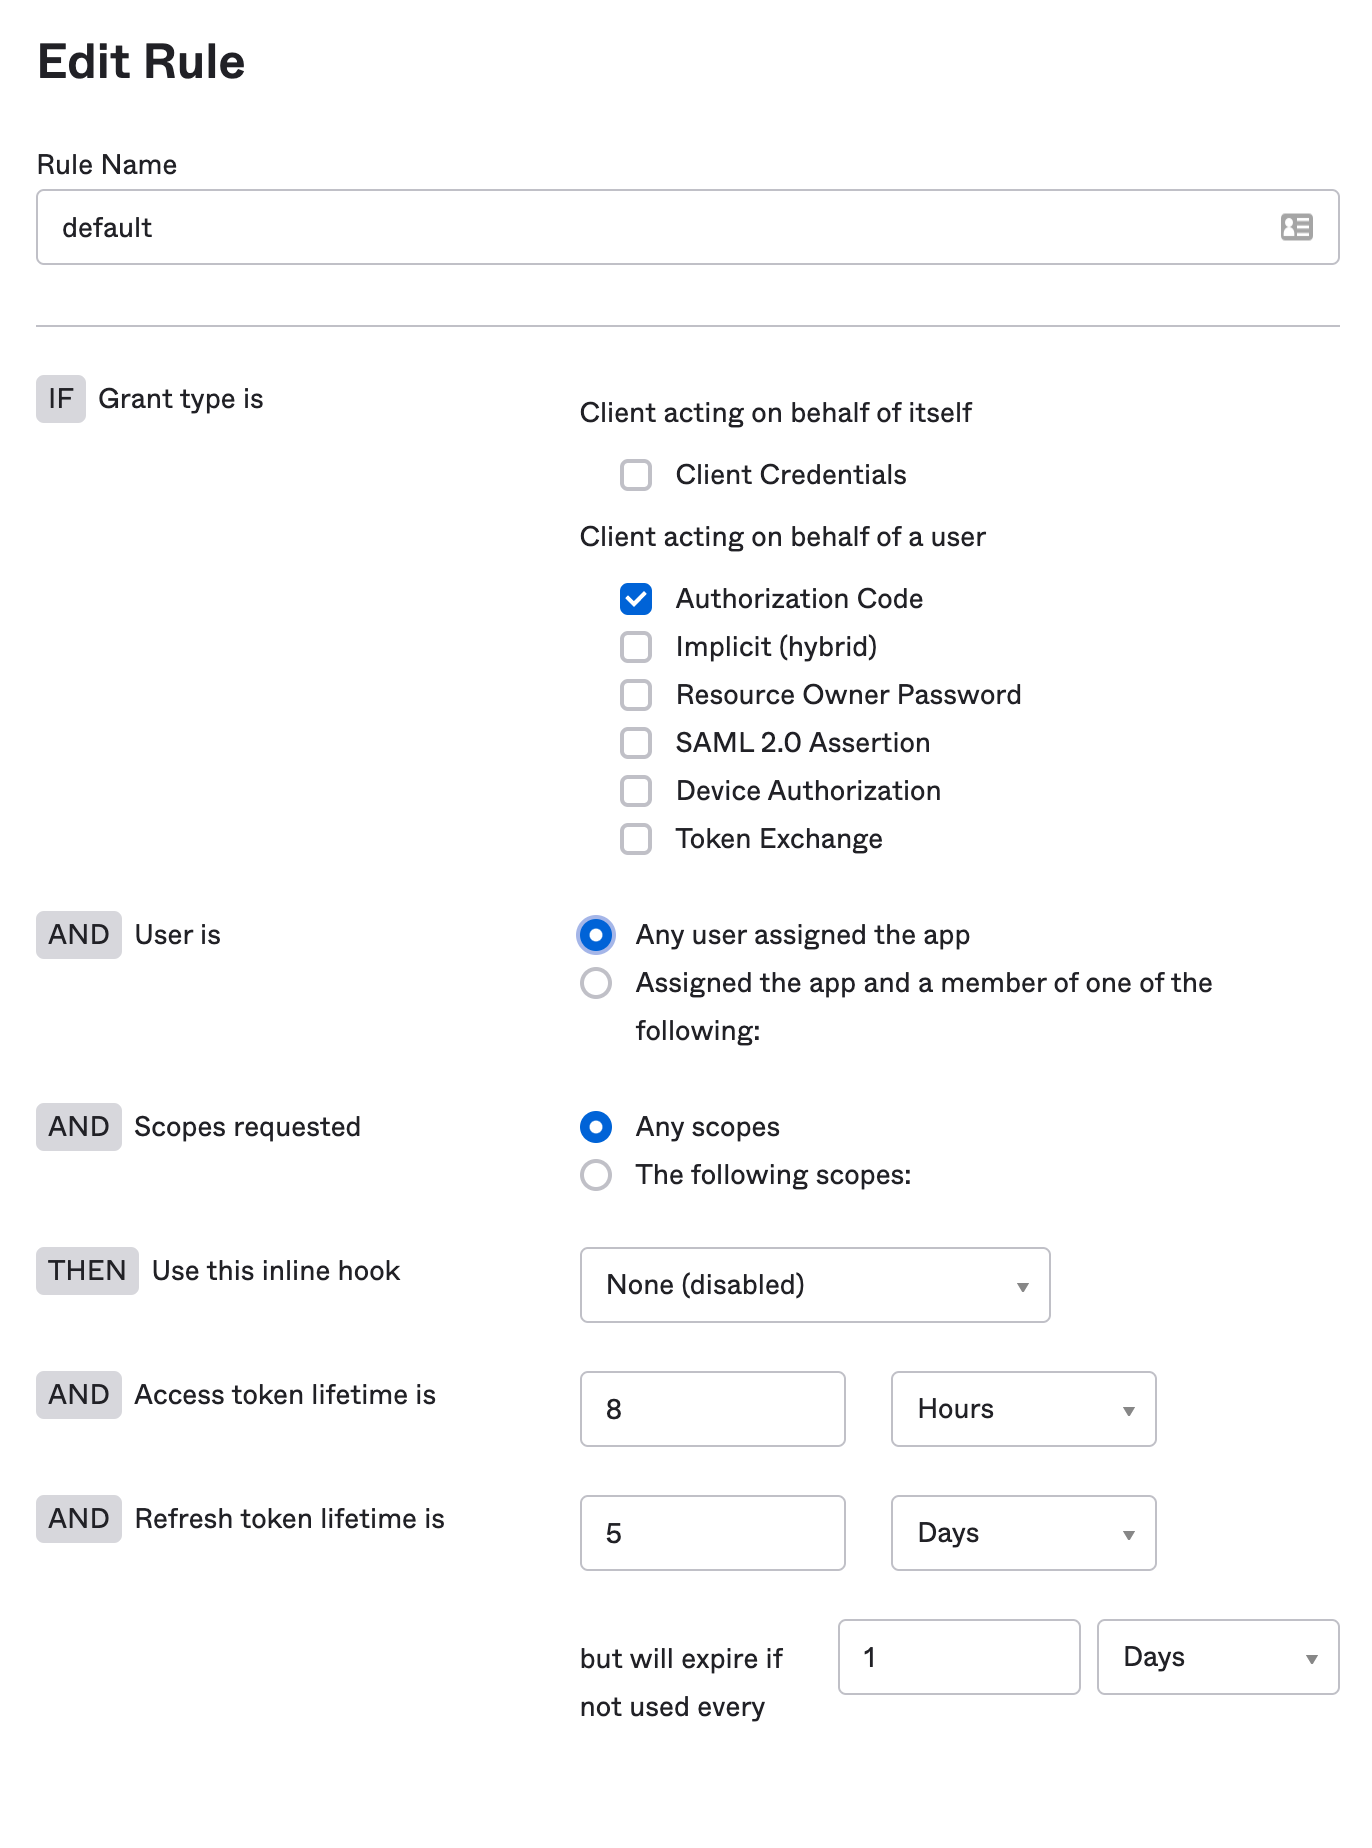
- Add a name;
- Finally, click
Back to Authorization Servers, and copy theIssuer URI. You will need this later.
CLI login
In order to login with the CLI argocd login https://argocd.example.com --sso, Okta requires a separate dedicated App Integration:
- Create a new
Create App Integration, and chooseOIDC, and thenSingle-Page Application. - Update the following:
App Integration nameandLogo- set these to suit your needs; they'll be displayed in the Okta catalogue.Sign-in redirect URLs: Addhttp://localhost:8085/auth/callback.Sign-out redirect URIs: Addhttp://localhost:8085.- Either assign groups, or choose to skip this step for now.
- Leave the rest of the options as-is, and save the integration.
- Copy the
Client IDfrom the newly created app;cliClientID: <Client ID>will be used in yourargocd-cmConfigMap.
- Edit your Authorization Server
Access Policies:- Navigate to the Okta API Management at
Security > API. - Choose your existing
Authorization Serverthat was created previously. - Click
Access Policies>Edit Policy. - Assign your newly created
App Integrationby filling in the text box and clickingUpdate Policy.
- Navigate to the Okta API Management at
If you haven't yet created Okta groups, and assigned them to the application integration, you should do that now:
- Go to
Directory > Groups - For each group you wish to add:
- Click
Add Group, and choose a meaningful name. It should match the regex or pattern you added to your customgroupclaim. - Click on the group (refresh the page if the new group didn't show up in the list).
- Assign Okta users to the group.
- Click on
Applicationsand assign the OIDC application integration you created to this group. - Repeat as needed.
- Click
Finally, configure ArgoCD itself. Edit the argocd-cm configmap:
url: https://argocd.example.com
oidc.config: |
  name: Okta
  # this is the authorization server URI
  issuer: https://example.okta.com/oauth2/aus9abcdefgABCDEFGd7
  clientID: 0oa9abcdefgh123AB5d7
  cliClientID: gfedcba0987654321GEFDCBA # Optional if using the CLI for SSO
  clientSecret: ABCDEFG1234567890abcdefg
  requestedScopes: ["openid", "profile", "email", "groups"]
  requestedIDTokenClaims: {"groups": {"essential": true}}
You may want to store the clientSecret in a Kubernetes secret; see how to deal with SSO secrets for more details.